Google Analytics and Google Tag Manager Setup
This guide will help you install Google Tag Manager and Google Analytics 4 on your website.
Introduction
Google Analytics 4 (GA4) is the latest version of Google’s analytics platform, designed to provide a more comprehensive view of user behavior across websites and apps. GA4 uses an event-based data model, enabling more detailed tracking and analysis of user interactions. GA4 is the most common web analytics tool used to evaluate website performance at NC State.
Google Tag Manager (GTM) is a separate tool that simplifies the process of adding and managing marketing and analytics tags and pixels on your website without modifying the site code directly. Tags and pixels are small code snippets used to collect data and send it to third-party tools like GA4. We strongly recommend installing GA4 via GTM to simplify future custom analytics or digital advertising setup, for tag and pixel installation, and to decrease page load times.
Getting Started
To get started, you will need admin-level access to your website’s WordPress dashboard and an NC State Google account. If you need assistance with these, contact your website manager or designated IT support representative.
This guide will cover these recommended steps:
- Set up GTM
- Install GTM on your WordPress site
- Set up and configure GA4
- Install GA4 via GTM
- (Optional) Connect your GA4 account to a free Looker Studio report template
Set Up Google Tag Manager
- Log in to GTM using your NC State Google account.
- If you don’t already have a GTM account created for your website, click “Create Account.”
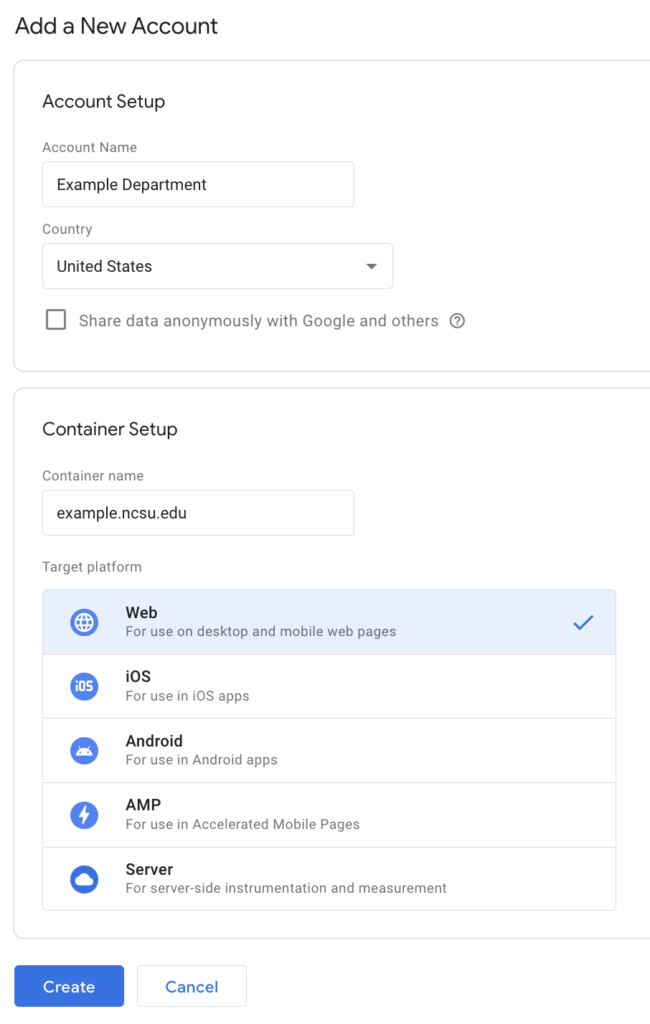
- Give the account a name such as “Example Department Website” and enter your website URL as the container name, such as “example.ncsu.edu.”
- Under “Target platform” select “Web.”
- Click “Create.”
You will be prompted to review a service agreement and either accept or reject it.
On the next screen, you will be prompted to install the GTM tag on your website. You don’t need to copy the entire code snippet, just the unique code that starts with “GTM-.” This is your GTM account identifier.

Optional: For more information on setting up a GTM account and container, see the GTM Google Support page.
Install GTM on Your Website
To install GTM on your website:
- Log in to your WordPress dashboard.
- Navigate to the Plugins section.
- Install the GTM4WP plugin.
- Optional: Read this tutorial on installing a WordPress Plugin.
- Once the plugin is installed and activated, navigate to Settings > Google Tag Manager in the WordPress dashboard.
- Paste the GTM account ID beginning with “GTM-” in the corresponding field.
- Important: Make sure the “Container code ON/OFF” setting is set to “On” and “Container code compatibility mode” is set to “Manually coded.”
- Click “Save Changes.”

Set Up Google Analytics
This section will present a brief overview of how to set up a GA4 account. For a more detailed guide, view the official Google documentation page.
To set up a new GA4 account and property:
- Sign in to Google Analytics using your NC State Google account.
- Create an Account:
- In the Admin panel, click on the “Account” dropdown and select “Create Account.”
- Enter an account name and configure data sharing settings as desired.
- Click “Next.”
- Create a Property:
- Under “Property Setup,” enter a property name, such as “Example Department,” and select your desired reporting time zone and currency.
- Click “Next” and configure your property settings (e.g., industry category, business size).
- Complete Setup:
- Click “Create” and you will be prompted to accept or reject the terms of service.
- Set Up Data Streams:
- Add a “Web” data stream by following the on-screen instructions.
- Your GA4 property is now created and you will receive a Measurement ID for tracking.
- Important: Copy the Measurement ID, as you will need it for the next section.
Install GA4 via GTM
This section will walk you through how to install GA4 on your website via GTM. For detailed instructions, refer to Google’s official documentation.
To install GA4 via GTM:
- Add a GA4 Configuration Tag:
- In GTM, click “Tags” > “New.”
- Choose “Tag Configuration” > “Google Analytics: GA4 Configuration.”
- Enter your GA4 Measurement ID.
- Set Trigger:
- Click “Triggering” > “All Pages.”
- Save and publish your tag.
- Verify Installation:
- Use GTM’s preview mode and GA4’s Real-Time report to ensure data is being collected correctly.
For a video tutorial covering the above steps, see:
Configure Optional GA4 Settings
Some useful settings in GA4 are not enabled by default. The following steps are recommended, but optional.
- Enable Google Signals for Demographics and Interests:
- In the Admin panel, under Property, click “Data Settings” > “Data Collection.”
- Toggle on Google Signals and confirm.
- Navigate to “Data Settings” > “Data Collection” again and ensure “Enable Demographics and Interests Reports” is toggled on.
- You will be prompted to accept or reject
- Enable Enhanced Measurement:
- Under Property, click “Data Streams.”
- Select your data stream and toggle on “Enhanced Measurement.”
- Under settings, make sure all enhanced measurement tracking options are enabled.
- Change Data Retention Setting:
- In the Admin panel, under Property, click “Data Settings” > “Data Retention.”
- Change the event data retention period to 14 months and click “Save.”
Connect GA4 to Looker Studio
Looker Studio, formerly known as Google Data Studio, is a data visualization tool that lets users create reports and dashboards. It integrates with various data sources like Google Analytics, Google Ads, and BigQuery. Looker Studio can be useful for building shareable, on-brand reports and dashboards that visualize GA4 data about how your website is performing.
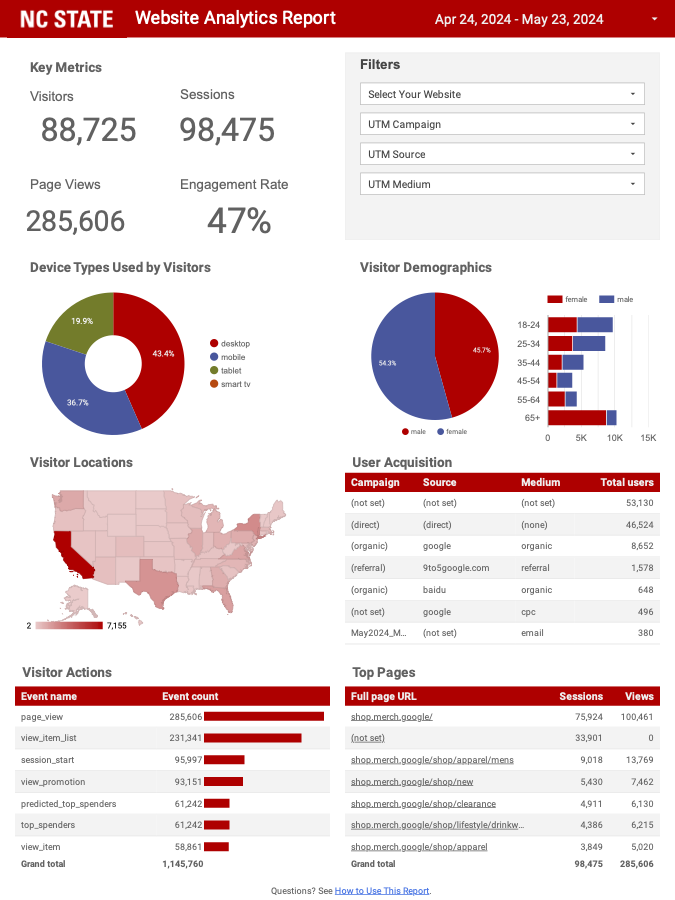
University Communications and Marketing has made this Looker Studio report available for free to the NC State community. This report is designed to provide a brief snapshot of your website’s performance, and can be exported as a PDF for easy sharing. The report contains instructions on how to use it.
To use the report with your new GA4 account data:
- Open the Looker Studio Report:
- Visit the Looker Studio report.
- Log in to Looker Studio with your NC State Google account.
- Make a Copy:
- Click on the three-dot menu (More options) in the top right corner.
- Select “Make a copy.”
- Set Up Data Source:
- In the “Copy this report” dialog, click “Create new data source.”
- Select “Google Analytics” and choose your GA4 account.
- Click “Add” and then “Copy Report.”
- Customize the Report:
- Once copied, customize the report as needed using your GA4 data.
For more details, visit the Looker Studio help center.
Optional: Add Microsoft Clarity
Microsoft Clarity is a free web analytics tool that provides insights into user interactions on your website through features like session recordings and heatmaps. It can help you understand user behavior, identify pain points, and inform enhancements to the website. It can be helpful to use Microsoft Clarity on your website in addition to, but not necessarily in place of, GA4.
To install Microsoft Clarity on your website via the GTM account you set up earlier in this tutorial, follow these steps:
- Sign up for Microsoft Clarity
- Go to the Microsoft Clarity website.
- Click on “Get Started”
- Sign in with your Microsoft account or create a new one.
- Follow the instructions to create a new Clarity project for your website.
- You will receive a tracking code snippet during the setup process. Keep this available for use in the next steps.
- Add Microsoft Clarity via GTM
- Navigate back to the GTM account and container you set up earlier in this tutorial.
- In the GTM Dashboard, click on “Tags” in the left-hand menu.
- Click “New” to create a new tag.
- Click “Tag Configuration” and select “Custom HTML.”
- Copy the tracking code snippet provided by Microsoft Clarity during the setup process.
- Paste the code snippet into the HTML field in the Custom HTML tag configuration.
- Click on “Triggering” to set up when the tag should be fired.
- Select “All Pages” to ensure that the Clarity tracking code is loaded on every page of your website.
- Click “Save” to save your new tag configuration.
- Click on “Submit” in the top-right corner of the GTM Dashboard.
- Add a version name and description, then click “Publish” to make the changes live.
For a video tutorial covering these steps, see: