Gravity Forms Slate Integration
You can submit prospective student leads to Slate by creating a Gravity Form on your site. The information below discusses how to implement this integration on your site.
The NC State Web Platform has two ways to leverage Slate forms:
- Using the Slate Form Embed block
- Configuring Gravity Forms to submit form entries via a web hook
This documentation discusses how to configure option two. This option allows for more customized and better visually integrated forms on your site while still allowing important prospective student information to flow into the university’s Slate systems.
There are two aspects to getting Gravity Forms working with Slate:
One-time Initial Configuration
Activate the Gravity Forms Webhooks Add-On plugin. If you are not able to activate plugins, you may need to ask your site administrator to activate this plugin. If it is not already installed on your site, submit a ticket to wordpress@help.ncsu.edu to have the plugin installed.
This plugin is used to submit form entries to Slate and is used in the form-specific configuration section.
Form-specific Configuration
Existing Gravity Forms can be “upfitted” to begin submitting data to Slate, but the steps below assume that you will be creating a new form.
To begin, create a new blank form with a name and an (optional) description of your choice. Add the desired fields to the form. You can include any fields you would like, but the table below includes what fields can be passed into Slate.
Some fields are optional while others are required. These requirements differ based upon if you are submitting information about prospective undergraduate, graduate, or non-degree students.
The “user-facing” fields below are either recommended or required to be fields within your Gravity Form. The “back-end” fields will be used later in the form configuration process.
A general rule of thumb within marketing communications is that more form fields will result in fewer people submitting the form. Therefore, it is recommended that you only include the absolutely necessary user-facing fields in your form.
Undergraduate
Field Key Description Location Required First Name firstUser-facing Required Last Name lastUser-facing Required Email emailInclude instructions to use personal email address rather than a school-issued or a parent’s email address. User-facing Required Date of Birth date_of_birthUser-facing Strongly Recommended Entering Year entering_yearExpected year to enroll at NC State Almost Always User-facing Required Academic Interests academic_interestsPotential areas of studies from EMAS list Usually User-facing Required Student Type student_typeFirst Year or TransferUser-facing or Back-end Required College collegeCollege name based upon this list Back-end Recommended Instance instanceSlate instance ( ugrad, grad, or nds)Back-end Required Entry ID entry_idGravity Forms entry ID Back-end Recommended Parent’s First Name parent_firstName of parent User-facing Recommended Depending Upon Strategy Parent’s Last Name parent_lastName of parent User-facing Recommended Depending Upon Strategy Parent’s Email parent_emailEmail of parent User-facing Recommended Depending Upon Strategy Channel/Medium of Lead lead_sourceAttribution for lead Back-end Recommended Source URL source_urlURL of page where form submitted Back-end Recommended Entry Date entry_dateDate when form submitted Back-end Required
Graduate
Integration coming soon
Non-degree
Integration coming soon
Once your form has been created, you will now need to configure the integration with Slate. To do this, go to the “Webhooks” section of your form’s settings and create a new Webhook integration. Configure the Webhook per the steps below.
- Provide a
Nameof your own choice. This will only be seen by site administrators. If you are unsure of a name, “Slate Integration” is a good default choice. - Add “https://web.ncsu.edu/slate/intake.php” as the
Request URL. - Retain “POST” as the
Request Methodand “JSON” as theRequest Format.
 Slate integration settings" class="wp-image-38069" />
Within the “Request Body” section, choose “Select Fields” to map your Gravity Form’s data to the corresponding Slate field using the appropriate fields listed above.
For each key you can either choose its value from one of the fields within your form or you can manually hard-code the value. When you manually hard-code a value it will be the same for everyone who submits the form. This makes sense for keys such as instance or college where you know that all form submissions will be from (for example) undergraduates and the College of Sciences.
While some keys should always be mapped to the user input and other keys should always be hard-coded, some keys will vary based upon the strategic purpose of your form. For example, if the form is placed on a page for prospective computer science students to request more information, you can manually populate that key rather than having the prospective student select “Computer Science” from a dropdown. The context of the form indicates and ensures how the key should be populated.
Many of these fields are important to help make sure that prospective students and their families do not receive duplicate or conflicting information. First name, last name, email, and date of birth are the most important fields for appropriate contact matching within Slate. Data is transferred from Gravity Forms into Slate once per day in the early morning.
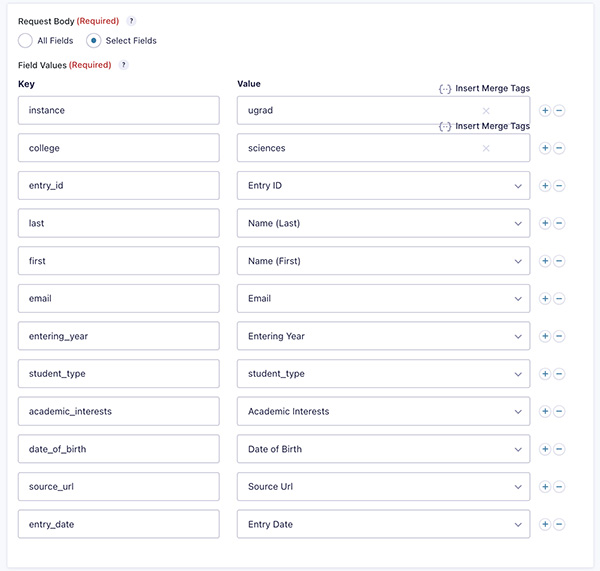
instance and college keys are manually hard-coded in this example.You can now save the web hook settings, and you’re all done!
Make sure your form is added to the relevant page(s) on your site. You can also submit test entries and email wordpress@help.ncsu.edu to verify that your entries are being submitted to Slate as intended.
There are a few last items to consider to make sure your Gravity Form is ready to perform well:
- Make sure that the browser confirmation message is helpful. This can be updated within your form by going to Settings -> Confirmations.
- If desired, make sure that your follow-up email is appropriately configured for the form by going to Settings -> Notifications.
- A simple “we’ve received your information” follow-up email can be helpful, but ongoing nurturing should be handled via Slate. Brittany Pervorse can provide more information about how to send such emails through Slate.